

If you want to mine Ethereum yourself at home, you’ll need a mining rig. It is an effective tool that is particularly well suited for creating cryptocurrency.
In this article, you will learn how To Build Ethereum Mining Rig at your home.
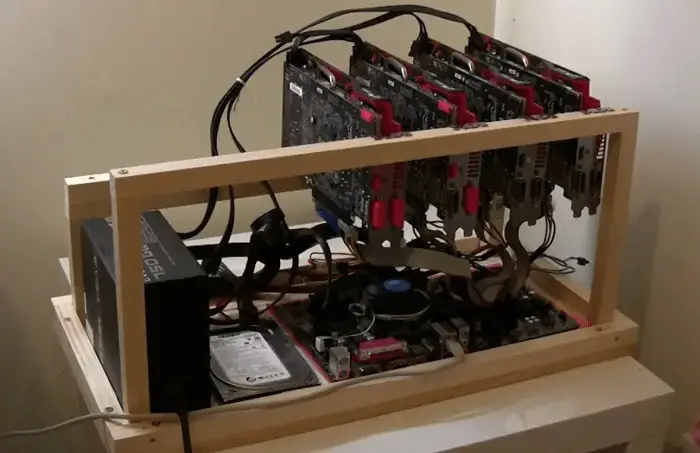
For those who are just getting started, it will be fascinating to discover that Ethereum mining rigs consist of a computer with numerous graphics cards.
To fight the heat generated by your mining setup, this robust computer is fitted with multiple GPU cards, a strong motherboard, a power supply, and a cooling system.
Ether, a cryptocurrency built on a blockchain, is supported by the Ethereum network. Apart from purchasing and keeping the asset, mining cryptocurrency is one of the most attractive ways to make money in the market.
A typical gaming system can be used to mine Ethereum. However, you can build a unit whose only objective is to mine Ethereum in order to maximize efficiency.
This requires some time and is not particularly cheap. However, it also implies that you are mining Ethereum far more effectively than a typical computer system.
Ethereum Mining Rig
The only difference between an Ethereum mining rig and any other computer you could build is that all the parts are located outside.
The construction and architecture of all-in-one computers are designed towards mining cryptocurrency like Ethereum.
The graphics processing units (GPUs) and the power supply unit are crucial parts of the equipment used to mine Ethereum. With just one graphics card, this system is capable of processing almost 27 million mathematical equations every second.
They make it possible for high-end gaming machines to handle the spectacular graphics of modern PC games.
Additionally, they are great for predicting as many hashes of Ethereum blocks as you can. On the Ethereum network right now, 600 trillion calculations are made every second.
These GPUs are typically found in at least two GPU mining rigs for Ethereum. They can, however, hold a lot more people. Your budget for creating your mining rig will determine how many mining processors you use.
Need for Ethereum Mining
To comprehend the increasing demand for Ethereum Mining Rigs, let us draw a parallel. In the contemporary world, almost everyone possesses a functional regular Desktop or Laptop. Yet, when it comes to gaming, we opt for dedicated gaming computers.
The rationale behind this preference lies in the enhanced performance, increased efficiency, and other associated advantages that gaming systems provide over standard computers.
Likewise, an Ethereum Mining Rig is purpose-built for the task of mining Ethereum, even though Ethereum stands as the best cryptocurrency to mine with a CPU. Employing a dedicated machine tailored to this specific purpose proves more advantageous.
Components Required for building a Mining Rig
Before starting any building project, it’s important to learn about the essential components needed to build an Ethereum mining machine.
Let us study these requirements in detail.
1. Hardware
Several Graphics Processing Units (GPUs) are available for constructing an Ethereum mining rig. Presented below are a few preferred Ethereum miner hardware options:
- NVIDIA GeForce RTX 3090 Ti
- AMD Radeon RX 580
- NVIDIA GeForce RTX 2070
- AMD Radeon RX Vega 56
- NVIDIA GeForce GTX 1070
- AMD Radeon RX 5700 XT
- NVIDIA GeForce RTX 3090
2. Software
The software serves the purpose of linking the Ethereum mining rig to the network. Be careful about the malware that comes with the mining software when you use this to build the machine.
- T-Rex Miner
- GMiner
- EthOS
- TeamRedMiner
3. Building Materials
Here are the most important tools and parts you need to have before you start making a mining rig:
- Random Access Memory (RAM)
- Central Processing Unit (CPU)
- Graphics Processing Unit (GPU)
- Computer Monitor
- Cooling Fans
- USB PCI-e risers
- Risers
- Angular Aluminum Bars (5×24”, 8×14”)
- Blocks of Wood (3 x 1” x 1”)
- Power Supplying Device
- Powered and Ethernet Cables
- Power Increasers
- Blank USB
- Power Switch
- Motherboard
Central Processing Unit (CPU)
If you only want to use a CPU to mine, you’ll need a high-end one. In this case, however, we will be mining with a GPU. So you can choose a CPU that is moderate or low-end CPU. It is better for you to get an Intel 8th or 9th Generation 1151 Socket CPU.
Motherboard
There are a few things to watch out for when picking a motherboard:
- Processor socket type
- the number of GPUs you will use (in this case, 6)
Among the best motherboards suited for mining are:
a. ASUS B250 Mining Expert
b. ASUS Prime Z390-P LGA1151
c. MSI Z170A Gaming Pro Carbon
Risers
PCI-e risers allow the GPU to be elevated from the Motherboard for better cooling and increasing airflow.
SSD
Any 240 GB or larger SATA SSD
Mining Rig
You can make your own 6 GPU Mining rig frame. Alternatively, you can buy one.
USB Flash Drive
Any USB Flash Drive with a 5GB capacity or more
Zip Ties
You will need 20+ Nylon Cable Ties also known as Zip ties.
Power Supplying Device PSU
PSU with a 1200 W Platinum rating would be great.
PCI-e Y-Splitter
If you are not using the PSU unit described above, you may need a PCI-e Y-Splitter.
List of Components
Here is a list of a few components that you will need to build your mining rig. They have been mentioned below category-wise.
| Component | Specifications | Link |
|---|---|---|
| Motherboard | ASUS Prime Z370-A | Buy on Amazon |
| Motherboard | ASUS Prime Z390-A | Buy on Amazon |
| CPU: | Intel Core i5-9400 Desktop Processor 6 Cores | Buy on Amazon |
| RAM | Patriot Viper Elite Series 4GB 2400MHz Single Channel Cas 6 DDR4 | Buy on Amazon |
| RAM | Bewinner Memory RAM DDR2 4GB | Buy on Amazon |
| PSU | Corsair HXi Series, HX1200i, 1200 Watt, 80+ Platinum Certified | Buy on Amazon |
| PSU | Straight Power 11 Platinum 1200W | Buy on Amazon |
| Risers | MintCell 6-Pack PCIe 6-Pin 16x to 1x Powered Riser Adapter Card | Buy on Amazon |
| Risers | Ubit 6 Pack Latest PCI-E Riser Express Cable 16X to 1X. | Buy on Amazon |
| SSD | Samsung SSD 860 EVO 250GB 2.5 Inch SATA III Internal SSD | Buy on Amazon |
| SSD | Crucial BX500 240GB 3D NAND SATA 2.5-Inch Internal SSD | Buy on Amazon |
| Internet connection | Mediabridge Ethernet Cable (15 Feet) | Buy on Amazon |
| Internet connection | TP-Link AC600 USB WiFi Adapter for PC | Buy on Amazon |
| Mining Rig | RXFSP 6/8 GPU Aluminum Stackable Open Air Mining Computer Frame Rig | Buy on Amazon |
| Flash Drive | SAMSUNG BAR Plus 32GB – 200MB/s USB 3.1 Flash Drive, Titan Gray | Buy on Amazon |
| Zip Ties | Dxg 100 Pack 6 Inch 2.5150mm Self-Locking Nylon Cable Ties Zip Ties | Buy on Amazon |
| PCI-e Y-Splitter | JacobsParts PCI Express Power Splitter Cable 8-pin to 2x 6+2-pin | Buy on Amazon |
4. Constructing the Frame for the Ethereum Mining Rig
- Using a drill and nails, you can screw the 14″-angled aluminum together to make two squares.
- Using a drill and screws, connect the squares together with longer pieces of aluminium to make a cuboid.
- Attach the last piece of aluminium about 3-4″ from the frame’s edge, as it will be used to hold the GPUs in place.
- Attach wooden blocks at the bottom to provide stability for the motherboard within the mining rig frame.
5. Assembling the Computer Components
- Place the motherboard within the frame.
- Secure the CPU in its designated position on the motherboard.
- Connect the cooling fan to the CPU.
- Install the RAM stick onto the motherboard.
6. Connecting the Power Supplying Unit
- Use cables to establish a connection between the power supplying unit and the motherboard.
- For linking the GPUs to the motherboard, power increasers are necessary.
- Once again, employ cables to connect the power increasers to the power supplying unit.
- Attach the chips on the USB cable of the power increasers to the motherboard.
7. Installing the GPUs in the Mining Rig
- Connect each power increaser to its respective GPU.
- Employ powered cables to link the power supplying unit to the GPUs.
- Maintain a minimum distance of 6″ between each GPU.
8. Connecting the Power Switch to the CPU
- This step involves a straightforward process of connecting the power switch to the CPU.
9. Adding Ethereum Mining Rig Software
- Download the required mining software.
- Store the software on the blank USB.
- Insert the USB into the designated socket on the motherboard.
10. Connecting to the Monitor
- Establish a connection between the monitor and the motherboard using an Ethernet cable.
Now, all you have to do is turn on the power supplying unit, and if everything works, the fans will start and the monitor will light up.
With this Ethereum Mining Rig, you can start mining Ethereum right away.
FAQs
Is Ethereum mining profitable?
As long as your GPU has a good hash rate and your power rate isn’t too high, it will make you money.
Cost to build the Ethereum mining rig?
With five to six GPUs, it can cost about $5000, but it can make about 0.350 ETH per month.
Conclusion
Now that you’ve finished building your Ethereum Mining Rig, you can close the frame and decorate it however you like.
You can make the frame look good with handmade aluminum angles. When connecting parts to the motherboard, make sure to use the manual and follow the instructions given.