

Ethereum has emerged as one of the most popular cryptocurrencies, offering a decentralized platform for smart contracts and decentralized applications (DApps).
Mining Ethereum can be a lucrative endeavor for those willing to invest time, effort, and computing power.
In this blog, we will walk you through the process of mining Ethereum on a Windows operating system, providing step-by-step instructions for beginners.
Benefits of Mining Ethereum
After Bitcoin, Ethereum is arguably the second-most popular cryptocurrency. It was the first cryptocurrency to use “smart contracts” and currently has the second largest market capitalization in the whole cryptocurrency market. Individual, decentralized, and self-executing agreements known as “smart contracts” are coded into the blockchain.
Ethereum, created by Vitalik Buterin, launched its beta version in 2015. The Ethereum virtual machine, or EVM, is featured as a representation of financial agreements including swaps, options contracts, and coupon-paying bonds. The EVM is capable of performing smart contracts.
Ethereum can be used to carry out employment contracts, operate as a reliable escrow, and carry out wagers and bets.
According to experts and cryptocurrency analysts, mining Ethereum is more profitable than mining Bitcoin. The most recent data shows that Ethereum miners bring in an average of $77 million per day, as compared to Bitcoin miners’ $67 million. Thus, many industry professionals hold the view that mining Ethereum rather than Bitcoin is typically more profitable.
Ethereum Mining Hardware
Before you begin mining Ethereum, you’ll need to ensure your hardware meets the necessary requirements. Here’s what you’ll need:
- A powerful graphics processing unit (GPU): Ethereum mining is primarily GPU-based. Look for GPUs that offer a good balance between hash rate (mining speed) and energy efficiency. Popular choices include NVIDIA GeForce and AMD Radeon cards.
- Sufficient RAM: Aim for at least 8GB of RAM to ensure smooth mining operations.
- Adequate storage: Have enough storage space to download and store the Ethereum blockchain, which can take up several gigabytes of space.
- Stable internet connection: A reliable and high-speed internet connection is crucial for mining Ethereum.
GPUs
GPU miners are the first and most popular option for mining Ethereum on Windows. These mining rigs are frequently the first option for most people who want to start cryptocurrency mining and are prepared to make a small initial investment and have a suitable version of Windows installed.
GPU mining rigs are the best way to mine Ethereum on Windows.
Simply said, GPU mining is popular because it works. This kind of mining uses graphics cards, or more precisely, their GPUs, to produce Ethereum over an extended period of time. The profit you can anticipate will be higher the more and better cards you use.
The drawback of this is that competent and efficient GPU miners are frequently expensive.
The majority of the expense goes towards the GPUs, but don’t overlook the motherboard, power supply, cooling, electricity, etc.
CPUs
The CPU choice of hardware could be used to mine Ethereum on Windows 10, however this is typically not recommended.
The simplest and most fundamental explanation for why this is true is that CPU mining will usually bankrupt you. When compared to the costs of electricity and cooling, the amount of Ethereum that CPUs would produce would appear to be negligible.
So why is CPU mining still a thing?
Well, just because it’s readily available.
One of your few options is CPU mining if you’re interested in learning how to mine Ethereum on Windows but don’t want to spend any money on gear. Depending on your computer and its settings, you might make a profit or break even, but the most typical outcome is a continuous period of negative income.
ASICs
The most profitable alternative now on the market is undoubtedly ASIC Ethereum mining. ASICs might be the best option for mining Ethereum on Windows 10.
Application-Specific Integrated Circuits, or ASICs, are specialised tools created for a single use—in this case, mining cryptocurrencies.
ASICs outperform its rivals in the majority of areas of the subject: they are generally simple to use, don’t take long to set up, and require little to no maintenance or repair work. However, their high expense is compensated by the fact that they are incredibly effective.
ASICs do have drawbacks, though. You may quickly come to the realisation that ASICs are typically very hard to find when considering how to mine Ethereum on Windows 10 with ASICs.
People immediately steal them off once they are stocked into online marketplaces or stores. It’s as if these people kept refreshing the page every few minutes for days just to be the lucky one to get an ASIC.
The other significant problem with ASICs is a relatively recent one. GPU miners are ready to boycott and “go on strike” because they believe ASICs have made Ethereum mining unfair.
Although this has been a problem for a while, it was just announced that a brand-new line of ASICs is almost ready to be released. The fact that these new ASICs are six times stronger and more efficient than their predecessors was expressly emphasised in the release.
This news galvanized the Ethereum community; many argue that such devices generate market imbalance and instability within the GPU mining community.
It is difficult to foresee what would happen to ASIC-based Ethereum mining if the boycott and strikes are successful. The Ethereum community implores the Ethereum developers to act; yet, it is difficult to predict what, if any, steps, if any, will be taken.
Before actually going out and investing in one of these devices, it would be advisable to read up on the news and conduct some research if you’re considering ASICs as the recommended hardware for Ethereum miners for Windows 10. They may be extremely strong and successful, which typically translates into great profits, but this may also be the cause of their demise.
Step by Step Guide for Mining Ethereum on a PC
Assuming you’re using Windows, I’ll speak primarily about how to mine Ethereum there.
Step 1: Install Drivers
The entire process of setting up a wallet, downloading your miner, configuring things on Windows, and running your batch program should take less than 10 minutes.
Install drivers first the AMD GPUs Click “Support & Drivers” on amd.com.
Type in your GPU details and select “Display Results”
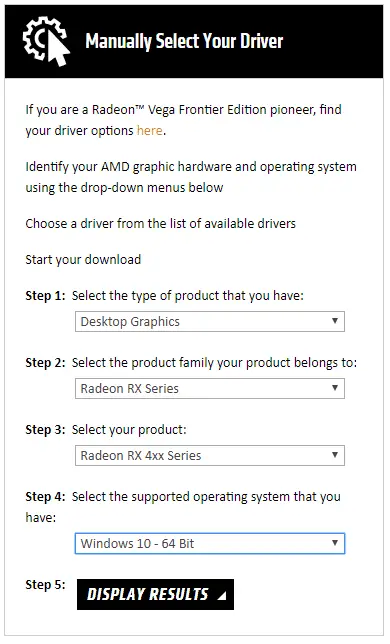
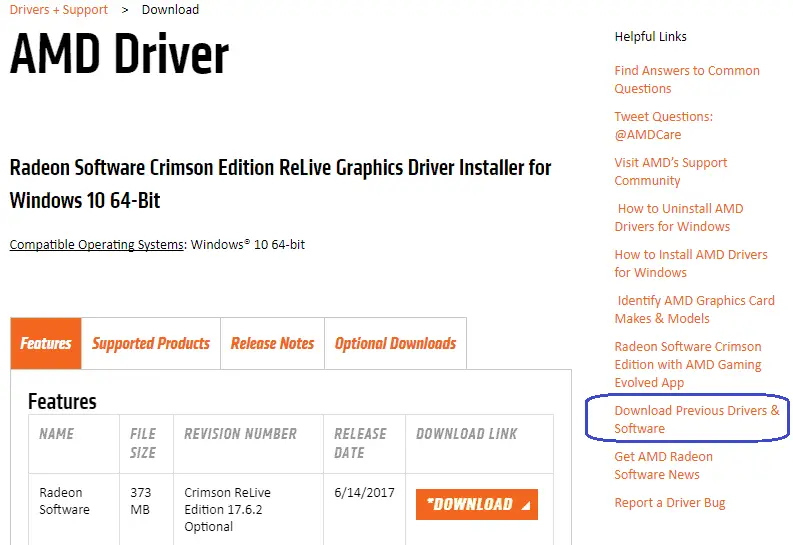
To download the current driver, click the Download button.
Alternately, you can select older versions by clicking “Download Previous Drivers & Software” on the right side. This is suggested since, depending on your cards, some driver versions are known to be excellent for mining, for example:
- R9 and older – use 15.12
- RX 4XX Series – use 16.9.2 or 16.10.3
- RX 5XX Series – as they are newer, I’d suggest going with the current driver for the time being.
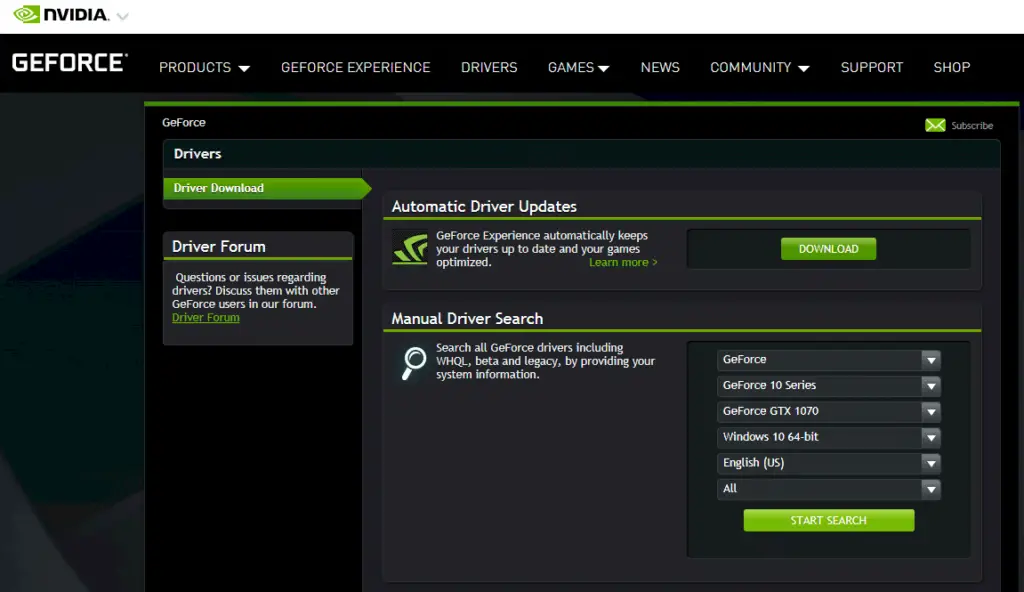
Nvidia GPUs: Visit https://www.geforce.com/drivers to get the most recent Nvidia GeForce drivers.
Click “Start Search” after entering your card details. From the results, get the most recent driver version.
After installing your GPU drivers as usual (Next, Next, Ok, etc.), reboot your computer.
If there are no warning signs on your GPUs when you open Device Manager (search for it in the Windows search bar), your GPUs have been successfully recognized.
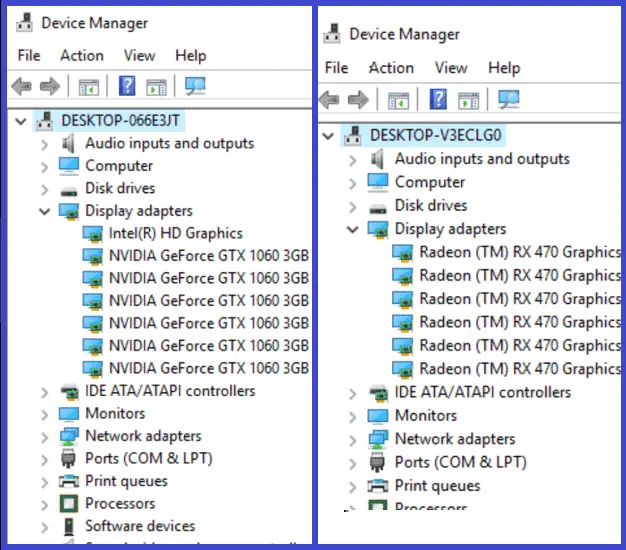
Installing all of the GPUs at once, followed by the driver installation, has proven successful for several miners. Others like an alternate method where they first install a single card, then the drivers, and shut down the system.
They install the remaining GPUs while the system is off. Once finished, they turn it back on and let Windows recognise them all. While Windows is detecting each card, be aware that the system may lag and flicker sometimes or go black for a short period of time.
Overall, I’ve had success with both methods, so if you encounter a problem with one, simply delete the drivers and try the other method.
If you do need to uninstall your drivers, use DDU (Display Driver Uninstaller) program to do so thoroughly before starting over.
Note: Steps 2-4 describe how to download the official Ethereum wallet; however, you must wait for the whole Ethereum blockchain to sync before doing so. Jump down to step 4 (easy) and establish a wallet using MyEtherWallet to skip this step and get going much faster.
Step 2: Set up a Digital Wallet
To receive and store the Ethereum you mine, you’ll need a digital wallet.
Choose a wallet that suits your needs in terms of security, accessibility, and ease of use. Popular wallets for Ethereum include MetaMask, MyEtherWallet, and Ledger.
Get an Ethereum Client (Mist)
I’ll walk you through setting up Mist so you can start using its familiar and user-friendly graphical user interface:
The Ethereum wallet that you’ll need to receive any mining profits is included in the Mist package. Additionally, Mist has an Ethereum browser with a number of features like messaging, a social network, and tutorials. As a piece of advice, these tutorials and the social network are beneficial study resources.
Ask the Ethereals if you need help with any step of this process; don’t be afraid to do so.
Visit https://github.com/ethereum/mist/releases and choose the most recent release to download Mist.
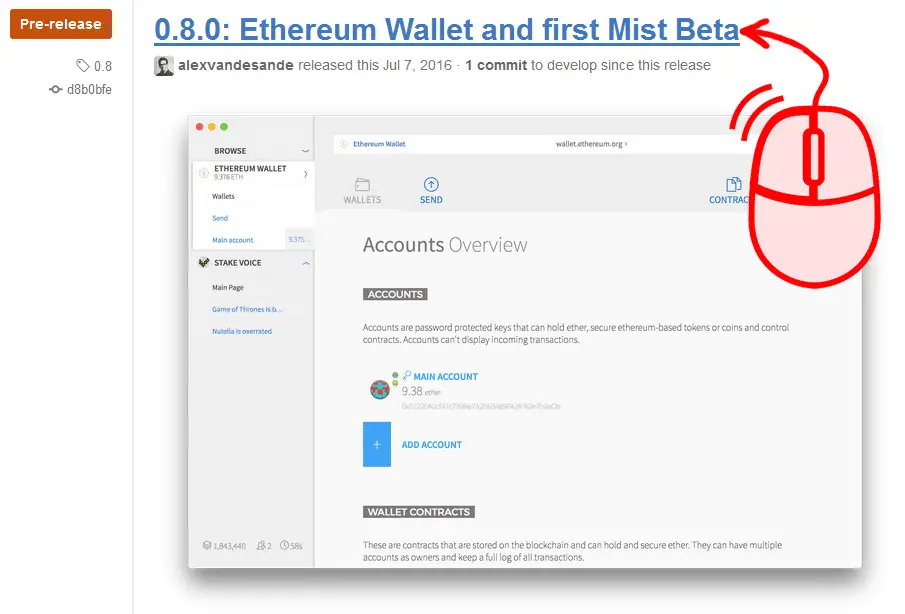
Scroll down to the Downloads. You can use the standalone Ethereum wallet or Mist. Choose a location to save the “Ethereum Wallet” zip file after you download it. Use a good file extraction tool to extract it, then note the folder it was extracted to. Locate and launch the Ethereum app by navigating to the new folder.
Download the Blockchain
The next step is to just wait while the Ethereum blockchain downloads and syncs. The process can take some time because the file is rather large.
When it’s finished, take a moment to get familiar with the Mist app; it has a user-friendly layout. Expect some glitches since the app hasn’t been fully finished yet.
Setup your wallet
Create a new account and contract-based wallet by opening the Ethereum wallet. The payout address to which you will receive mining rewards from your pool or directly from the blockchain is stored in this wallet.
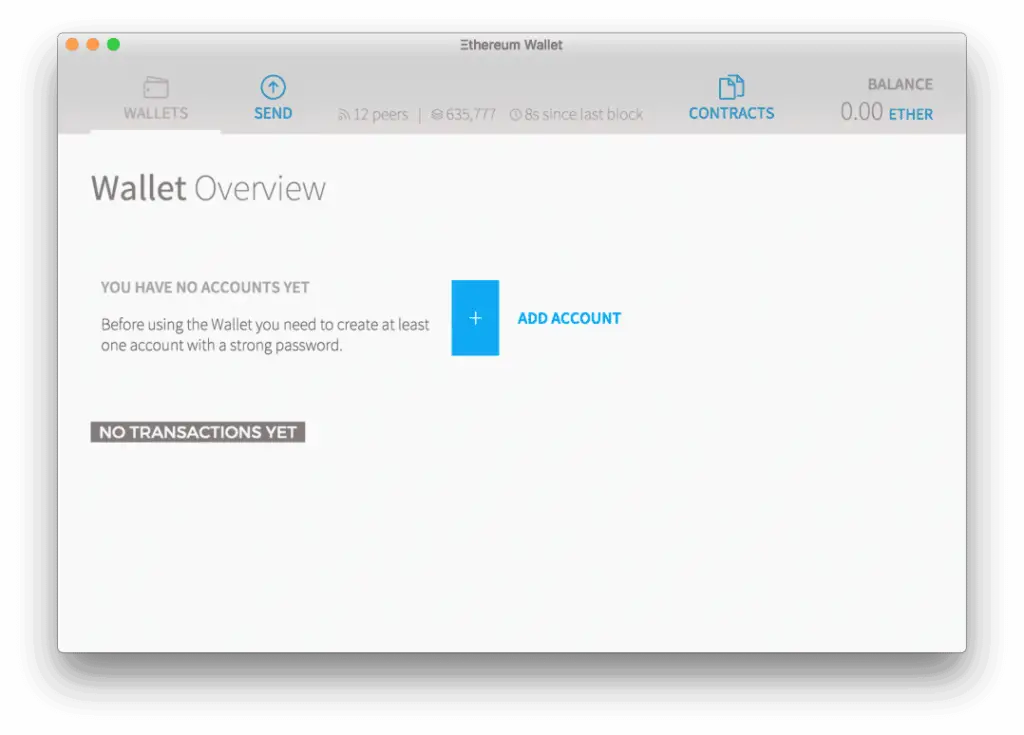
Create a new account and give it mining name. Keep the password in a securely.
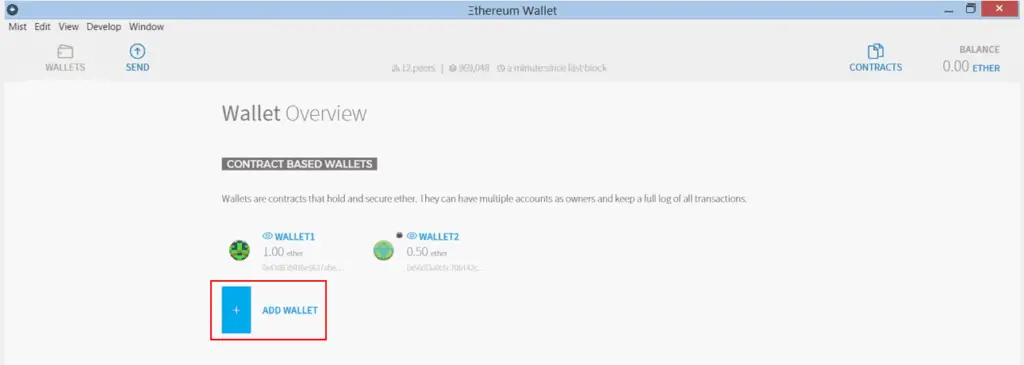
After creating the Account, add a wallet and note down or copy the unique address into a text file.
The letters “0x” will begin this address. It’s required to get ETH mining rewards!
What is Geth “go-ethereum”?
Mist also includes Geth, a popular command line interface. You can download only the most recent Geth app for your system, which can do all of Mist’s operations (and more) from the command line.
Geth (short for “go-ethereum”) enables more direct communication between your miner and the Ethereum network but calls for some programming expertise. Geth will be more helpful to you as your coding and Ethereum mining skills advance, but for the time being it is not advised as the quickest way to begin mining Ethereum.
Get an Ethereum Client (MyEtherWallet)
Visit MyEtherWallet.com to avoid waiting for Mist to finish downloading the Ethereum blockchain. Beware of phishing websites, please. Always check the domain three times.
MyEtherWallet.com is the actual website. Click “Create New Wallet” after providing a secure password.

Obtain your “Keystore File” by downloading it, then select “I understand. Continue.” button.
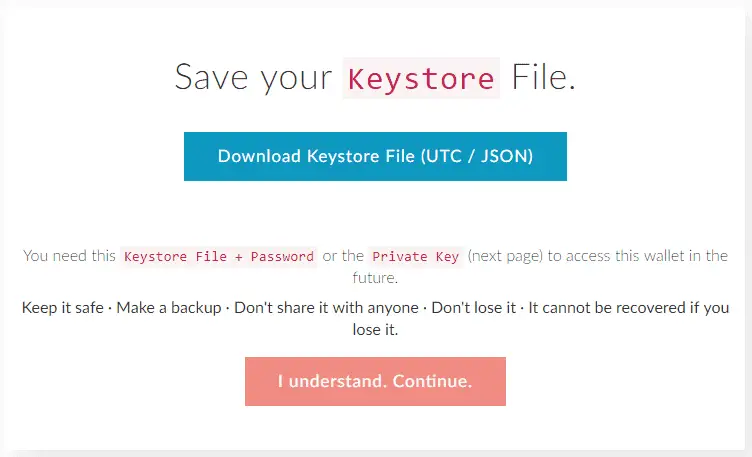
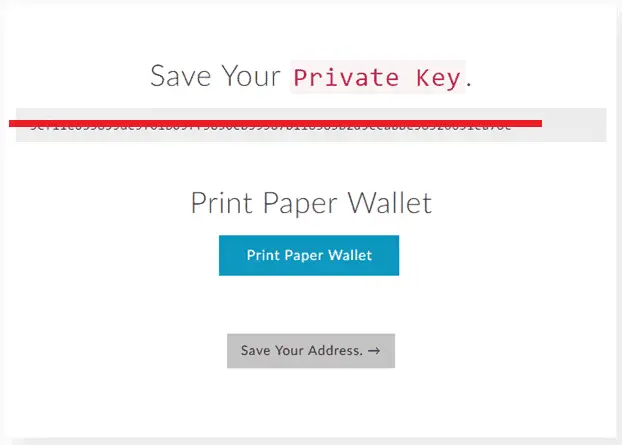
Save the given private key.
Opening a notepad and entering your information, including your password, private key, and your Ethereum address (which you’ll receive shortly), is a good practice.
Save that text file in an encrypted file with your Keystore File (using a program like WinRar).
Afterward, erase the individual files (leaving only the encrypted file stored digitally) and save a copy of that to a USB drive or cloud storage.
Click “Save Your Address,” and then choose “Keystore File” from the list of options. Select your recently downloaded Keystore File (which begins with “UTC…”) by clicking “Select Wallet File” and browsing to it.
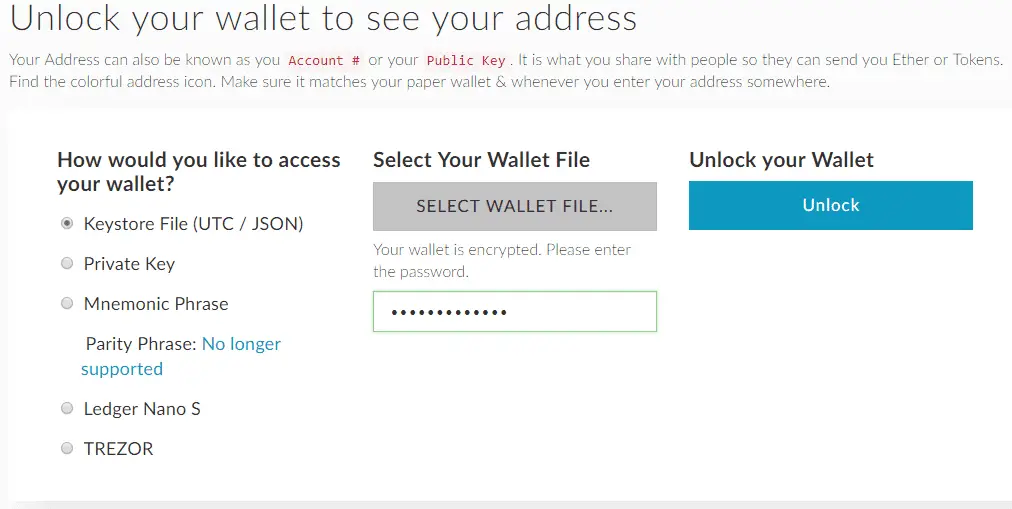
Once again, your password will be required.

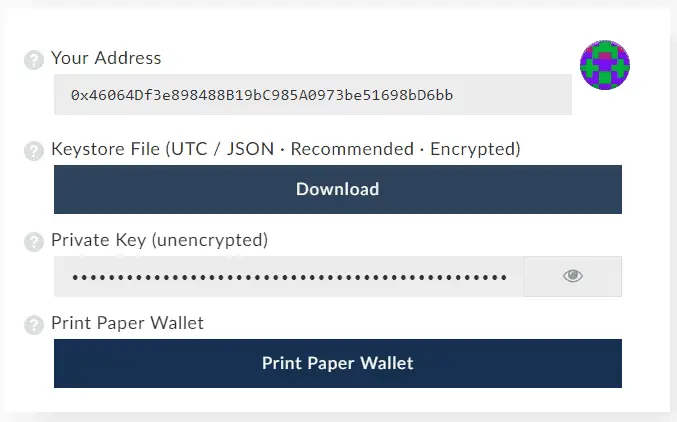
Once unlocked, scroll down to “Your Address” to view your Ethereum Wallet address, which will be used for mining.
For easy access, save it to a different notepad text file and place it on your desktop. Sharing this address is acceptable because it is how people will send you ether and where your mining rewards will be sent, but never reveal your private key!
Step 3: Download Mining Software
To mine Ethereum on Windows, you’ll need mining software. One of the most popular options is Claymore’s Dual Ethereum Miner, which supports both AMD and NVIDIA GPUs.
Other alternatives include PhoenixMiner, Geth, and Ethminer.
Download the mining software from the official sources and ensure it is compatible with your GPU and operating system.
We’ll be using Claymore Miner, a popular Ethereum mining software.
Visit Claymore’s original Bitcointalk topic and use the Google or Mega download links he gives to get the most recent version (don’t use other people’s links).
You should download the Catalyst and Cuda versions of the software, not the Linux version, which is the current version as of the time of this writing (14.6).
Windows may warn you when downloading the Claymore Miner, but if you utilised Claymore’s download URL, you can ignore this. Extract the folder to your Desktop after downloading it for convenience.
Step 4: Windows Settings
In order to prepare Windows for mining, the following settings need to be changed:
First, go to your power settings and set it to “Never” turn off or sleep because doing so will stop your computer from mining.
Next, manually change your system page file to 16 GB, or 16384 MB. You could also consider turning off Windows Updates if you want to minimise interference with your mining and other settings.
If you feel more confident leaving them on, you can, but keep in mind that there are very regular upgrades that sometimes reboot your system without your cooperation and therefore interrupt your mining.
In order to prevent Windows Defender or another antivirus program from flagging the Claymore mining application “EthDcrMiner64.exe” as malicious or attempting to disable/delete it, add an exception to it.

Step 5: Join a Mining Pool
Mining Ethereum independently can be a daunting task, especially for beginners.
Joining a mining pool allows you to combine your computing power with other miners to increase the chances of finding a block and earning rewards.
Some well-known Ethereum mining pools include Ethermine, Sparkpool, and F2Pool. Register an account with a mining pool of your choice, and make sure to note down the pool’s address and port number.
Set up pool-mining, as solo-mining is unlikely to make you any Ethereum unless you have a warehouse full of GPUs.
The first thing you should do is pick an Ethereum mining pool. There are several options available, but I suggest Nanopool or Etheremine.
Instructions on how to mine in a mining pool using the well-known Claymore miner are probably available on the home page or help section of the site.
Etheremine will be used in this guide’s examples. “Stratum mode using Claymores Miner” is a part that is located right on the home page of Ethermine.org.
Click “Edit” from the context menu when you right-click the text file “Start” in your Claymore miner folder on your desktop.
Visit the Ethermine website, then select all of the text in the first box under “Then start your miners by,” and then copy it.

You wish to connect to the nearest server based on your location and change the server’s text string as follows:
:eu1.ethermine.org4444
Inside your Text file you should now have:
setx GPU_FORCE_64BIT_PTR 0
setx GPU_MAX_HEAP_SIZE 100
setx GPU_USE_SYNC_OBJECTS 1
setx GPU_MAX_ALLOC_PERCENT 100
setx GPU_SINGLE_ALLOC_PERCENT 100
EthDcrMiner64.exe -epool us1.ethermine.org:4444 -ewal . -epsw x
- Replace “” with your Ethereum Wallet address (which starts with 0x…),copy that from your other text file and paste it here.
- Replace “” with any name you would like to create for your miner.
We’ll use “MiningRig1” for our example, so you now have:
setx GPU_FORCE_64BIT_PTR 0
setx GPU_MAX_HEAP_SIZE 100
setx GPU_USE_SYNC_OBJECTS 1
setx GPU_MAX_ALLOC_PERCENT 100
setx GPU_SINGLE_ALLOC_PERCENT 100
EthDcrMiner64.exe -epool us1.ethermine.org:4444 -ewal 0x46064Df3e898488B19bC985A0973be51698bD6bb.MiningRig1 -epsw x
Save your document with the bat extension as a batch file. To do so, select File > Save As, enter a name for it in the box, and then type “.bat” after the name.
Make sure “All Files” is selected in the ‘Save as type’ box before clicking ‘Save’.
Congrats! A batch file is now available for mining!
The new Bat file should be sent to your desktop with a shortcut created for it. The text file version of the file may then be deleted.

Step 6: Start Mining
Once you have your wallet, mining software, and pool details ready, it’s time to configure and start mining. Here are the basic steps:
- Extract the mining software files to a folder on your computer.
- Open the mining software’s configuration file using a text editor.
- Replace the default mining pool address and port with the ones provided by your chosen mining pool.
- Save the configuration file and close it.
- Open a command prompt or PowerShell window.
- Navigate to the folder where you extracted the mining software files.
- Enter the command to start mining, which is usually the name of the mining software executable file.
For the miner to start, double-click your Bat file. The miner will start, execute the setx commands to initialise each of your GPUs, create the DAG file on each of your GPUs, and begin hashing. To see your hashing speed, click “s” after it has ran for roughly 20 seconds.
Now that you have this data, you can use the Ethereum mining calculator once more to calculate an even more precise estimate of your revenue. Return to Ethermine.org and paste your wallet address into the Address window at the top to track your pool earnings.
Choose ‘Check Status’ from the menu:

Step 7: Monitor and Optimize
Your Mining Operation After you start mining, keep an eye on your mining software’s output, which will provide information on your hashrate, temperature, and other relevant metrics.
Adjust the GPU settings as needed to optimize performance while keeping the temperature under control. Regularly monitor your mining pool’s website or dashboard to track your earnings and ensure everything is running smoothly.
Conclusion
Mining Ethereum on Windows can be a rewarding venture for those interested in cryptocurrency mining.
By following the steps outlined in this guide, you can get started on your mining journey. Remember to consider the hardware requirements, choose a suitable wallet, download the right mining software, join a mining pool, and monitor your mining operation for optimal results.
Frequently Asked Questions
1- How Many Ethereum Can Be Mined?
There is no cap on the total number of Ethereum that can be created, unlike with Bitcoin. About 13,500 Ether are mined every day.
2- Can I mine with my CPU instead of a GPU ?
Due to the speed increase of GPUs, CPU mining is no longer viable or worthwhile. Even entry-level GPUs are approximately 200 times quicker than CPUs for mining applications.
3- Can I mine using any ETH wallet address?
Any ETH wallet address can be used for mining, but before doing so, double check with the website first. Some exchanges do not allow mining or only permit small deposits. Simply make sure the wallet you use is appropriate for mining.
4- How about platforms for cloud mining?
AVOID investing in Ethereum cloud mining sites and associated investment programs. 99.9% of cloud mining sites are Ponzi schemes or Ponzi schemes with a fractional reserve.
Although there are a handful that have been around for a while, there haven’t been any 3rd party audits of the hashing power supplied, and profits are often quite modest unless you are actively seeking people to join (another red flag of ponzi related activity).